Homemade Peanut Butter Cups Dark Chocolate
Highlighted under: Sweet Haven
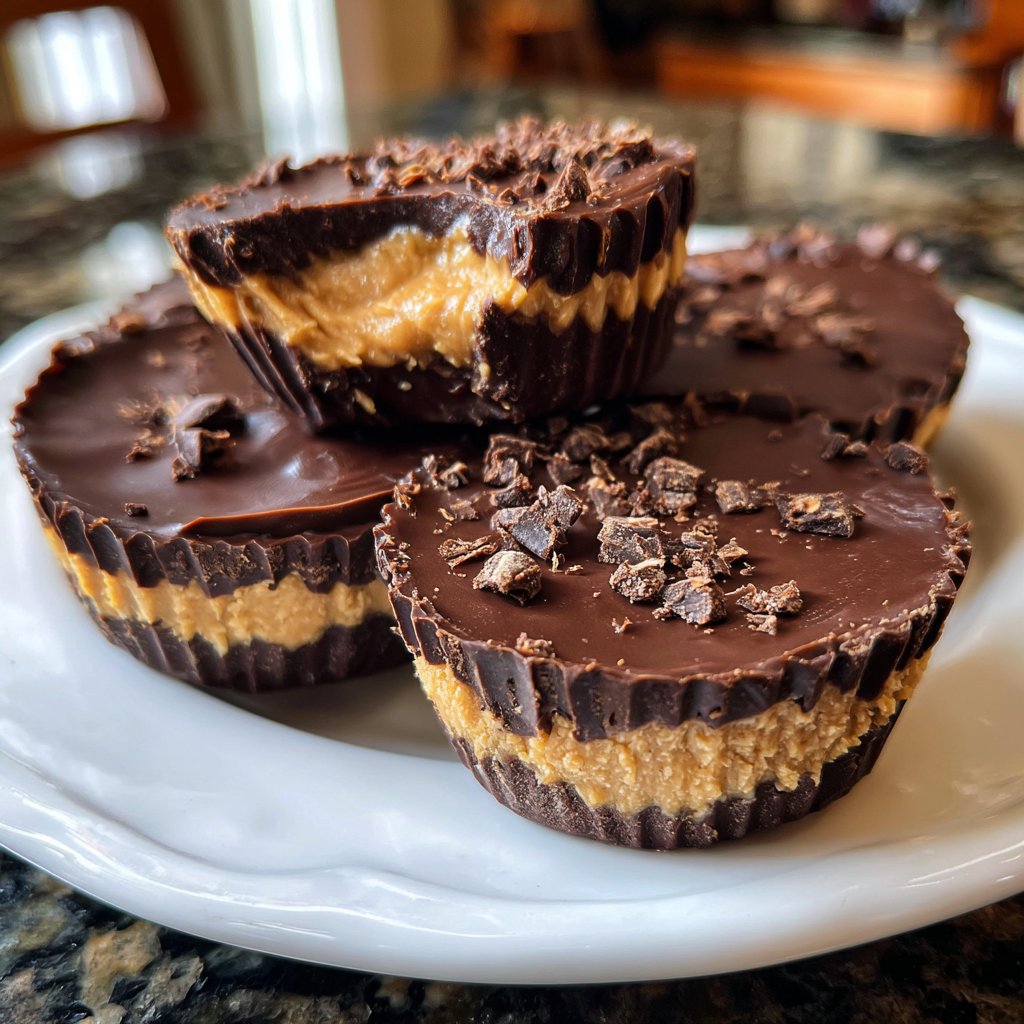
I’ve always been a fan of peanut butter and chocolate, but nothing compares to the experience of biting into a homemade peanut butter cup. The way the creamy, rich filling contrasts with the dark chocolate coating is pure bliss. Making these cups from scratch means I can control the ingredients and ensure they're as delicious as possible. I love playing with the ratios of peanut butter and sugar to get the flavor just right, and the satisfaction of enjoying my own creations makes them even more special.

In my quest to create the perfect peanut butter cup, I tried several recipes and settled on a method that balances the nutty flavor with rich dark chocolate beautifully. The key is to use natural peanut butter, which results in a creamier, more flavorful filling. I experimented with different brands of chocolate and found that a high-quality dark chocolate makes all the difference in depth of flavor.
One handy tip is to chill the cups for a bit before unmolding them. This helps them retain their shape and makes the chocolate easier to work with. Each bite is a delightful combination of sweetness and saltiness, and I can't help but smile each time I enjoy one!
Why You'll Love These Peanut Butter Cups
- Rich, decadent dark chocolate that pairs perfectly with creamy peanut butter
- Customizable sweetness to suit your preference
- Simple ingredients create a delightful homemade treat
The Role of Quality Ingredients
The success of your homemade peanut butter cups heavily relies on the quality of your ingredients. Opt for a natural peanut butter that has no added sugar or oils for a more authentic taste. High-quality dark chocolate with at least 60% cocoa will provide a rich flavor that perfectly complements the sweetness of the peanut butter filling. The balance of these elements is key; it creates a treat that doesn't feel overly sweet or heavy, allowing the flavors to shine through.
Coconut oil is also an essential ingredient in this recipe. It not only helps the chocolate melt smoothly but also aids in achieving a perfectly glossy finish. If you prefer a different texture, you can experiment with refined coconut oil which has a neutral flavor, or opt for a nut butter blend using almond butter to add a unique twist. Just keep in mind that any changes can alter the final taste and consistency.
Perfecting Your Technique
When melting chocolate, patience is key. Using a microwave in 30-second increments and stirring in between helps prevent overheating, which can lead to a seized texture. If your chocolate does seize, you can save it by adding a teaspoon of vegetable oil to loosen it up again. This technique ensures a smooth pour when topping each cup, providing a beautifully finished look that's just as pleasing to the eye as it is to the palate.
For uniform cup sizes, using a standard muffin tin is ideal. Filling each liner evenly and tapping the tin gently after adding chocolate helps eliminate air bubbles and creates a clean surface. If you're looking to scale the recipe down, a mini muffin tin works well too—just be mindful of the fill levels, as they require less of each layer. Baking with different sizes adds a fun variety to your depending on the occasion.
Ingredients
Before you get started, gather all the necessary ingredients to create these delicious treats!
Ingredients
- 1 cup creamy natural peanut butter
- 1/2 cup powdered sugar
- 1 teaspoon vanilla extract
- 1/4 teaspoon salt
- 8 ounces dark chocolate
- 1 tablespoon coconut oil
Once you have everything ready, you're set to make your own peanut butter cups!
Instructions
Follow these easy steps to make your homemade peanut butter cups!
Prepare the Chocolate
Melt the dark chocolate and coconut oil together in a microwave-safe bowl, heating in 30-second increments, stirring in between until smooth.
Set the Base
Line a muffin tin with cupcake liners. Spoon a small amount of melted chocolate into each liner, just enough to cover the bottom. Place in the refrigerator to set.
Make the Filling
In a bowl, mix the peanut butter, powdered sugar, vanilla extract, and salt until smooth and well combined.
Fill the Cups
Once the chocolate base in the liners has hardened, take them out and fill each one with the peanut butter mixture. Leave some space at the top for more chocolate.
Top with Chocolate
Spoon the remaining melted chocolate over the peanut butter filling until it's fully covered. Tap the muffin tin gently to smooth out the top.
Chill and Serve
Return the filled cups to the refrigerator for about 30 minutes or until the chocolate has fully set. Enjoy your homemade peanut butter cups!
After chilling, your peanut butter cups are ready to be devoured!
Pro Tips
- For an extra touch, sprinkle a pinch of sea salt on top of the chocolate before it sets to enhance the flavor!
Storage and Shelf Life
Once you've made your delicious peanut butter cups, they can be stored in an airtight container in the refrigerator for up to two weeks. To ensure they retain their shape and texture, separate layers with parchment paper. If you'd like to keep them longer, consider freezing them. Just be sure to wrap each cup in plastic wrap or place them in a freezer-safe bag. They can last for up to three months in the freezer, maintaining their delightful taste when defrosted in the fridge overnight.
Defrosting is simple, but be cautious of letting them sit out at room temperature for too long; this can cause the chocolate to soften. If you prefer a firmer bite, enjoy them straight from the fridge after defrosting, as this will keep the chocolate coating nice and crisp. Always check for any signs of freezer burn before enjoying your treats!
Customizing Your Cups
One of the best parts about making your peanut butter cups at home is the ability to customize them. To add an extra layer of flavor, consider adding a pinch of cinnamon or a splash of maple syrup to the peanut butter filling. This not only enhances the taste but can also create a wonderful contrast with the dark chocolate coating.
If you're in the mood for a crunchy texture, mix in some chopped nuts or crushed pretzels with the peanut butter filling. This makes your cups not only more interesting but also adds a satisfying crunch to each bite. Don't hesitate to experiment with different types of chocolate—milk or white chocolate could offer a sweeter profile, catering to various taste preferences.
Questions About Recipes
→ Can I use milk chocolate instead of dark chocolate?
Yes, you can substitute milk chocolate for a sweeter flavor, but it will alter the overall taste.
→ How should I store the peanut butter cups?
Store them in an airtight container in the refrigerator to keep the chocolate firm.
→ Can I make these cups vegan?
Yes, just use dairy-free dark chocolate and a vegan powdered sugar substitute.
→ How long do they last?
These peanut butter cups will stay fresh for about one week when stored properly.
Homemade Peanut Butter Cups Dark Chocolate
Created by: Vivienne Cole
Recipe Type: Sweet Haven
Skill Level: Intermediate
Final Quantity: 12 cups
What You'll Need
Ingredients
- 1 cup creamy natural peanut butter
- 1/2 cup powdered sugar
- 1 teaspoon vanilla extract
- 1/4 teaspoon salt
- 8 ounces dark chocolate
- 1 tablespoon coconut oil
How-To Steps
Melt the dark chocolate and coconut oil together in a microwave-safe bowl, heating in 30-second increments, stirring in between until smooth.
Line a muffin tin with cupcake liners. Spoon a small amount of melted chocolate into each liner, just enough to cover the bottom. Place in the refrigerator to set.
In a bowl, mix the peanut butter, powdered sugar, vanilla extract, and salt until smooth and well combined.
Once the chocolate base in the liners has hardened, take them out and fill each one with the peanut butter mixture. Leave some space at the top for more chocolate.
Spoon the remaining melted chocolate over the peanut butter filling until it's fully covered. Tap the muffin tin gently to smooth out the top.
Return the filled cups to the refrigerator for about 30 minutes or until the chocolate has fully set. Enjoy your homemade peanut butter cups!
Extra Tips
- For an extra touch, sprinkle a pinch of sea salt on top of the chocolate before it sets to enhance the flavor!
Nutritional Breakdown (Per Serving)
- Calories: 380 kcal
- Total Fat: 26g
- Saturated Fat: 15g
- Cholesterol: 195mg
- Sodium: 85mg
- Total Carbohydrates: 32g
- Dietary Fiber: 3g
- Sugars: 24g
- Protein: 6g